Showing posts with label mod podge. Show all posts

Monday, November 7, 2011

Easy & Cheap Fall Decor

Easy and Cheap Fall Vase from Dollar Store Items


I love fall. Especially Halloween. Mostly for decorating reasons. I think that witch doormats and spiderweb encases porches make just about anyone feel like a kid again. 

But, when a holiday is over I want the decorations down ASAP. The day after the kids and I went out and pulled up all the tombstones, took down the spiderwebs and lights, and went around the house tucking all of our Halloween decorations away until next year. 

As soon as Joe came home from work, much to his excitement I could tell, he went to the attic and brought down the fall tote. We opened it and proceeded to take out five things. Yep, 5. Some wooden leaves for the front porch, a wreath, a cornucopia, and a scarecrow votive holder. That was it. "This can't be all", I told him. His look back assured me that it was. 

I was SURE that we had more. I debated putting some of the Halloween stuff back out like the plug in pumpkins, but decided that it would drive me crazy if I did. A trip to Dollar Tree was in order I decided. 

The next day Claire, Joseph, and I were on the hunt. But, as it was November 2nd, all of the fall decor had already been put away, and the only things out were related to Christmas. Ugh!!! 

In the clearance isle I spotted some paper leaf doilies. I decided that I HAD to buy something, so I took them home and decided to tape them to our windows like falling leaves. Then I decided that it would look pretty to Mod Podge them onto a large vase I had been saving. It turned out great, I think. We have been putting pumpkin scented candles in it and lighting it at night, it adds a nice "fall-ish" glow to the room, and is perfect to keep up until Christmas decorating time. 

Here is the how-to:

Things you will need:
-mod Podge and foam brush

-paper leaf doilies (or dried real leaves)

-clear acrylic spray
-vase

-candle 
-razor blade or exact-o knife


First off, grab a vase or large jar that can fit the leaves you have chosen. I went for a large mouthed tall skinny vase, but any jar would do as well. You will want to liberally coat your foam brush and coat the vase 1/2 of the way up with a thick layer of mod podge. I experimented with going all of the way up, but found that half way yielded the best results. 

After you have coated the jar, begin to layer your leaves in a pattern that you like. Be sure to be careful is using paper leaves as they will tear easy. Carefully smooth them down as you place them as to limit air bubbles. 

Carefully place a layer of mod podge over each leave as you place them, making sure that all surfaces of the leaves are covered.
After all of the leaves are placed and covered, allow your vase to dry. I turned mine upside down to help protect the finish.
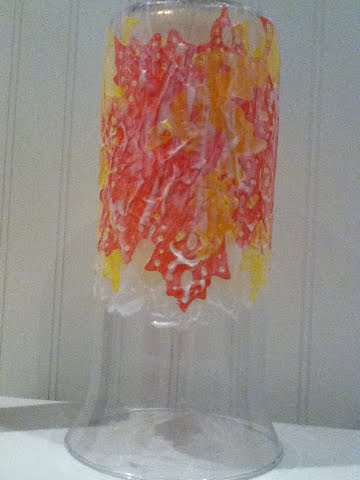
As soon as your vase is dry, seal the leaves by spraying a clear acrylic spray all over them. Be careful to only spray the area where there are leaves. Let dry again.

Next, take your razor blade or exact-o knife and cut along the perimeter of the leaves. The mod podge will come off quite easily, almost like a thin layer of dried glue on skin. Carefully peel off the excess and clean up any unwanted blemished on your glass.

Finally, grab a candle, light it and enjoy your masterpiece!! 

Friday, April 29, 2011

Got Books? Part I


                I love books. I mean love them! I have a bookcase full in my living room. And another bookcase in my bedroom that is a tad full. And the stairwell leading to the upstairs bed rooms is lined with books. And some boxes in the basement. OK, I may have a bit of a problem. Now I do pass books on. Friends, church, Goodwill, and so on. But, I still end up with more than I need to keep, and I decided I needed to do something with them. Well, actually I was gently asked (well, threatened, with a midnight drop off at St. Vincent de Paul) to clear some space up.

          While I did take a bunch to the kid’s school and posted some on freecycle, there were still some books that I wouldn’t mind getting rid of that no one seemed to want. I wanted to DO something with them, but I didn’t know what. Then I remembered an article I had read awhile back where the author suggested keeping a hollow book in your home to hide important papers or extra money. This makes a thief finding these things much less likely. While I didn’t make one for my personal things, I decided that I would make one for each of my kiddos. They were a hit! They each have a book that they can hide in their room to keep all of their favorite treasures in.  
          This also left me with a bunch of pages that I didn’t want to just throw out. I decided to jump on the book page wreath bandwagon and make one with what was leftover. See Got Books II tomorrow for that one :)!
          Materials needed for hollow book:
·         A hard back book you don’t mind taking pages out of
·         A marker or pen
·         A craft knife or razorblade
·         Mod podge
·         Foam brush
·         Ruler
Materials if also making wreath:
·         wreath form
·         hot glue gun
·         glue stick
·         pages you extracted from the hard back book


First, grab a book you don't mind re-purposing. (Sorry to anyone who loves "Among Thieves")


Next, get the ruler. Make sure that it is a fairly long book, as this will lend more stability to your hollow book. Open it up to page 40 or so and with your ruler and marker draw a border around much of the printed area. This will be the area that you will be cutting out with your knife.

Press your craft knife as hard down as possible with cutting into the shape so that you can go through more than a page or two at a time. You have a LOT of pages to go through and a life, so the more you can get through the better. After the initial pages are cut, there is no need to continue marking out the remaining pages as you will keep cutting within the boundaries of what has already been cut. Continue cutting out pages until there is around 1/5-1/4 of the book left. It is important to stop at this point as going any further will lessen the stability of your hollow book.

Now is the time for the mod podge and foam brush. Dip your brush into the mod podge and trace around the page every 10-20 pages. DO NOT glue around the first page that you cut into as this will glue your book closed. 

Then glue AROUND the outside of the book of the pages that have been cut, making sure to leave the first 10-20 pages free as this will lend a more realistic book look to the finished product. 


To get the best seal on the pages place the book under something heavy such as a weight or chair. Let the book rest there until dry. I usually just leave them out overnight and they are good in the morning.


Now you, or your kiddos, have a place to hide your important things. Like your Magic Wigglee Worms.