Thursday, January 12, 2012

Marble & Mason Jar Makeup Solution


OK, so the name doesn't exactly roll of one's tongue, but this has been the best addition to my makeup arsenal in quite some time.

I have sensitive skin. I break out like a maniac if I:
change face wash brands
fail to use a fresh towel to dry my face off after washing at night
get too much sun
use 95% of the makeup brands available at a drugstore

SO......
Since I have no plans on not wearing makeup anytime soon I am careful about what I use and take care to make sure that the products I use last as long as possible.

In come the mason jars. I love them. For cakes, presents, and even.......make up brush holders that double as makeup brush cleaners. Again with the awkward name, I know.

I like the look of a mason jar in the bathroom on my vanity to hold my makeup brushes in. It gave the vanity a shabby chic feel, and was cheap :). I placed flat glass stones from the Dollar Tree in the bottom to keep the brushes in place as well as to make them more raised so that I could grab the shorter ones with more ease.

I also found that these stones, or marbles, work wonders in helping to clean the brushes.

Here is what you will need:
  • mason jar or some other jar with a tight fitting lid
  • marbles or other small filler
  • baby wash
  • warm water
Step 1:
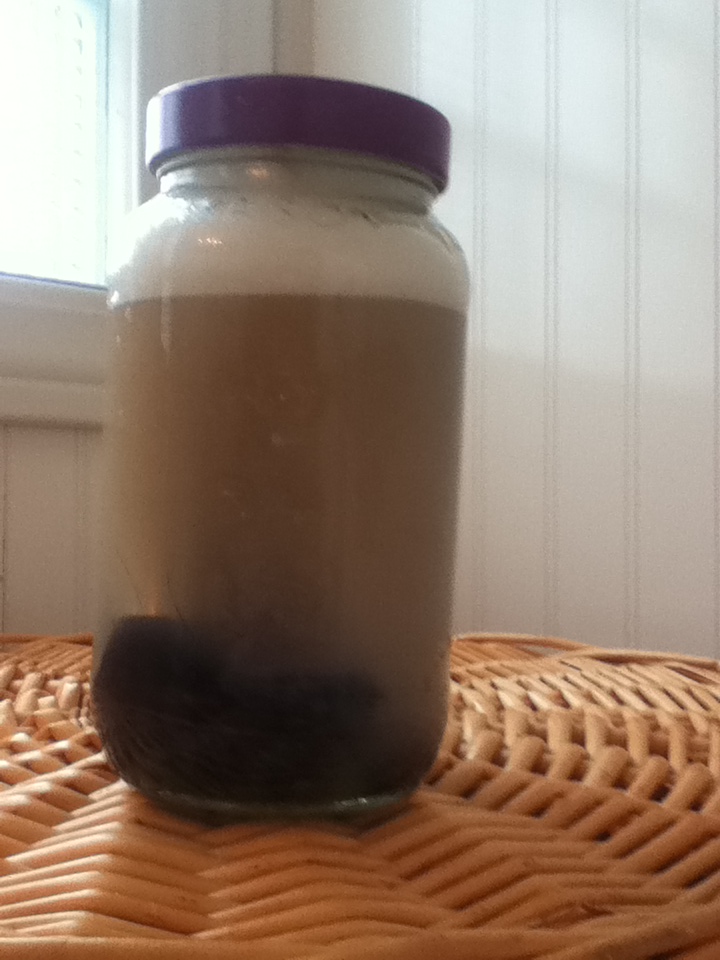
Grab your clean mason jar with some marbles/decorative stones in bottom.

Step 2:
Add a squirt of baby wash (same ingredients as many more expensive brush cleaners and gentle on your face and brushes!) and slowly add warm water.


Step 3:
Insert brushes and secure lid. Gently shake to agitate soap with marbles. This will help to loosen the dirt and get your brushes super clean. Repeat a few times.

Step 4:
Pour out soapy water and rinse thoroughly with clean warm water. Gently squeeze excess water from brushes and lay on a clean cloth to dry.
Your brushes will be cleaner than ever with minimal mess and clean up! I do this weekly when I deep clean the bathroom. A few shakes in-between tasks and by the time I am done, so are the brushes.

Monday, January 9, 2012

Caboodle Give-Away!

There are very few things that make me miss junior high. The akward hairstyles, leggings as pants (although this is now back in style...weird), and need I mention hyper-color?

 But there were a few things from the early 1990's that were pretty awesome.

Like?

Kristy from Kristy's Place is currently hosting a give-away for a new Caboodle.

Yes, you did hear that correctly. A caboodle. Like what I kept my makeup in in middle school and decorated with Lisa Frank stickers caboodle.

Caboodle is turning 25, and they have revamped their product design to offer a more grown up style of accespry organizer. The model offered by Kristy is:

"The Le Sophistique. It has every bag that you will ever need. Six bags to be exact. A clear zippered carryall, large upright bag, rectangular brush bag with protector flap, tubular bag, clear half moon bag, and Specs case. It also comes with 4 makeup brushes. I wasn't so keen on the quality of the makeup brushes included, but that's just fine as the bags in the Le Sophistique more than make up for them. There are small bags that easily slip into your purse. Bags great for carrying makeup and toiletries for overnight stays or small trips, and of course bigger bags to pack and organize for larger trips. The Le Sophistique stood out the most to me not just because of all options but because although made of durable material it's not a hard box, the Le Sophistique bags can be easily packed up wont take up a lot of space in your suitcase or other bags."


Make sure to visit her website for a chance to win! 

Thursday, January 5, 2012

Rainbow Cake in a Jar

Even though Miss C is uber grown up and mature now, she loves anything "in a jar".  Pies. Cookies. Cakes. You name it. She has excellent taste.


For her birthday this year I though that I would try something a little different. Rainbow cake in a jar. WHOOHOO. I know some of your minds just exploded. Rainbows and cakes and mason jars. Together. Wow.


"How can average everyday out of the box cooks make this?," you might ask.
 Don't let on, but it is really easy.

AND

REALLY messy.....especially if you are impatient and like to "taste test" the batter as I do to ensure my family received only the finest tastes.

Here is what you'll need:

  • Box of white (your best choice) or yellow cake mix
  • Can of frosting, or your own. I prefer a homemade cream cheese frosting, click for recipe.
  • 6 mason jars size 12 oz washed and dried
  • package of food coloring
  • cake pan 
  • water
  • hand mixer
  • 4 separate smaller bowls
  • small ice cream scoop or tablespoon 
  • cooking spray
Preheat your oven to 350. While the oven pre-heats make your cake mix according to the directions on the back of the box. (In my picture you may see milk, I always substitute milk for water in cake mixes, I think it gives them a fluffier and richer texture)
  Spray the inside of each mason jar well with non-stick cooking spray 
 
Separate the cake mix into each of the four bowls equally. Add food coloring. A lot. The more you add the more vibrant the color, and saturation is the key here. I used some cheap-o stuff from the Dollar Tree, and I ended up using the entire bottle of each color to get the tint I wanted.
Using your ice cream scoop or tablespoon carefully scoop the mixes into your jars. It work best to start with the darker color and work your way up to the lightest. Doing one color at a time in each jar, washing your spoon or scoop as you go from one to the next, is the easiest way to keep the colors from running together and ensuring you have the same amount in each jar.
Grab your cake pan and fill it with around 1/2 an inch or so of water. Add mason jars and place in over. Bake for 25-45 minutes. Mine took 45, but ovens vary so just keep an eye on them.


Transfer to a wire rack to cool.
Take a spatula or butter knife and carefully take off the rounded tops of the cakes if you are a perfectionist. If not, just go ahead and slop from frosting in there. I usually fall into the latter category, but since this is for Miss C, I was careful.


You can put the lids on these and store in the fridge, or just eat them as soon as you are done frosting them like a normal person.

Cream Cheese Frosting

I am a firm believer in the power of a good frosting. While you can doctor up a cake mix in a box, there is not much that can be done with prepackaged frosting.

Luckily, frosting is so easy to make.

Our favorite kind of frosting is one that is not too sweet, with a creamy texture that adheres well to the cakes. Mr. J and Miss C. both are not huge fans of super sweet frosting, so I have experimented with a lot of ingredients, and found this cream cheese frosting recipe seems to impress just about everyone with or without a sweet tooth.


Ingredients:
  • 8 oz. package of softened cream cheese
  • 2 tsp. vanilla extract
  • 2 c. powdered sugar 
  • 1 softened stick of butter (1/2 c.)
  1. Place softened butter and cream cheese in a bowl. Note that this recipe calls for softened. This does not mean melted. I have found that leaving them out for 15 minutes on the counter top brings them to about the right temperature. You can try to microwave them for 15 seconds or so, but be careful. Melted butter and cream cheese will NOT give you a thick and fluffy frosting, rather you will end up with something that is more like a rick glaze.  
   

2. Add vanilla. Slowly mix in powdered sugar


 3. Use immediately or over and store in refrigerator until ready to use.

My little girl is 12


Those of you who know Miss C. may think that she is turning 17 today, but in truth she has turned 12. Yes, she is funny, musically talented, a great writer, and can talk longer than anyone I know, but above all of this she is a great daughter. Happy Birthday C!!!!!!!

Wednesday, January 4, 2012

Cinnamon Apple Chips

I have been trying to be better lately about not baking so many sweets for the people I love. During the holidays I relapsed a bit, but did not go as crazy as I have in the past. Now that there are no good excuses to bake cookies for a bit, I am relegated to once again cooking up some healthy treats for everyone when they come home.


These cinnamon apple chips are a delicious alternative to regular potato chips, and are so easy to make. They even have a bonus....apple pie scented.air freshener for your whole house!

Here is what you will need:
  • Cutting mat
  • Sharp knife or mandolin
  • 2 large apples
  • 1/4-1/3 c. sugar 
  • 2 tsp cinnamon
Step 1:
Preheat oven to 250. Wash and dry off apple slices. Thinly slice on cutting mat or mandolin. Make sure to cut off the ends first, and then pick out the seeds. No one wants to eat seeds. Some of the slices will have a star shape to them in the middle.

Step2:
Mix your sugar and cinnamon in a small cup or empty spice container. Arrange slices in a single layer on a sprayed baking pan and sprinkle with spice mix.

Step 3:
Turn them every half hour until they are completely dry. Depending on how thick you sliced the apples, this could take 1-2 hours.

Step 4:
Place on cooling racks until completely cooled. Store in an air tight container. These do not have to be refrigerated.


Tuesday, January 3, 2012

Stitched Valentine's Day Card


I know, I know Christmas has just passed and already I am thinking about Valentine's Day..... I can't help it!

Valentine's Day is one of my favorites. All of the red and pink, heart decor, and glitter make me feel faint. I know that every day "should be like Valentine's Day" but I love the fact that we set aside a day to let the people in our lives know how much they  mean to us.

This does not have to break the bank however.

Making your own stitched Valentine's Day card is a great way to show someone in your life how much you care. The stitching adds a personal and unique touch, while you can save the $6 you didn't spend on a Hallmark card and add your own sentiment to the inside that will mean a lot more to the recipient. Or, if expressing yourself through words isn't really your thing, you can always google romantic poems/sayings and include one of the many results in your card as well.

Materials:
  • Blank cards with envelopes (Can find a pack of 8 at Micheal's $1 spot)
  • Yarn or thick thread of your choice
  • needle
  • shape to trace or a steady hand
  • pencil
Step 1:
Take your stencil/shape or freehand a design onto the front of your card lightly with pencil.
Step 2: Using your needle, punch holes closely together around your design. This will help to ensure a uniform stitch.
Step 3: Thread needle and following the holes you already created, work your way around the design.

That's it.
You are really only limited by your creativity in what you want to convey with your cards. Happy crafting!